If you run a FreeNAS, you might also be looking for an offsite backup option. In addition to using a cloud solution, a second NAS, which is housed in a different location, is also a good option.
My choice fell on a Synology Disk Station DS215j. The key data of the device, which costs around 150 euros: 800 MHz dual-core processor, 512 MB RAM, space for two 3.5″ hard disks (for RAID1) and a really quiet 92 mm fan. As software, Synology uses a customized Linux with its own interface, Disk Station Manager (DSM) 5.2 is the latest version.

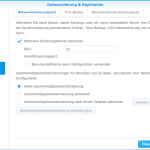
By activating it, there is also a new folder "NetBackup" - under this name the disk station can then be addressed with rsync.
Attention: I do not use SSH in my setup, so the data transfer is unencrypted. In an otherwise isolated private network, this is in my eyes no problem, but if the data is transferred over the Internet, you should use a VPN connection. SSH for the rsync connection itself slows down the data transfer significantly and makes the configuration more complicated.

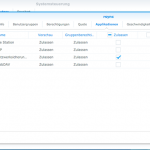
If the check mark is set, the preparations on the disk station side are already completed. Now it is time to configure the rsync jobs in the FreeNAS interface.
Create FreeNAS rsync job
To synchronize the data, it is necessary to set up a corresponding rsync call on the FreeNAS machine. The call, which must be made in the background, looks like this:
rsync -av /directory/the/protected/will be rsync@IP-the-diskstation::NetBackup/target directory --password-file /file-with-password.pwd

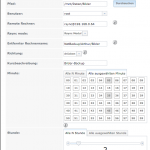
Rsync tasks have their own sub-item in the current FreeNAS 9.3 under "Tasks" - here you can specify both the directory to be backed up and the time interval. I decided to synchronize images every 20 minutes - a parallel task synchronizes the document folder every 10 minutes. It is important that under "Additional Options" the password file is specified, otherwise the comparison fails (unfortunately without a meaningful error message):

Conclusion: DS215j as rsync server for FreeNAS
The DS215j can be used as an rsync server without any problems - if you consider some points. Instead of the FreeNAS, a Linux installation could of course use this method to store data on the Synology NAS. If you need more security for data transfer, you can do this by using SSH - the setup for this is also described at several places on the net, for my purposes, the variant via the password file is completely sufficient. From the performance the DS215j writing about 35 MB/s via rsync, depending on how large or small the files are. If more small files need to be transferred, performance drops.
Theoretically, the setup could now be expanded and the DS215j could be turned into an external service such as Hidrive or Crash Plan secure. However, since the DS215j itself is already the backup and can also be located elsewhere, I don't think this is necessary.
