After use as Proxy and TV client here now another possible use for a Raspberry Pi: as VPN gatewayIn this specific case to provide several devices with a VPN connection. Practical if not every device directly supports VPN.
Update from 14.05.2015: I have the Setup to the VPN gateway for the use of the Raspberry Pi 2 updated once again. Of course, the speed still depends on the used VPN provider or many other factors.

Although there is already a finished imagewhich provides a Raspberry Pi as OpenVPN gateway, but the complete setup did not turn out to be so complicated in the end that I couldn't add it to the already existing Raspberry Pi. The faster the Raspberry (or the used single-board computer of your choice), the more performance the VPN will have afterwards.
Requirements
To use the Raspberry Pi as an OpenVPN gateway some requirements must be met:
- Raspberry Pi respectively Pi 2 integrated in the network with fixed IP address (not mandatory)
- VPN access (I use IPredator respectively PureVPN)
- A basic understanding of routing and Linux is advantageous because everything is done on the console
When you have all the parts together you can start the installation - the Instruction of IPredator helps, here are the most important cornerstones. First you have to install openvpn:
~ # sudo aptitude install openvpn
Then we need the .conf file of the respective provider, which also contains the necessary settings and keys. This file must be copied to /etc/openvpn can be copied. In the same directory we create an .auth file (the correct name of this file must be specified in the .conf file under auth-user-pass be registered). The .auth file contains only two lines with username and password for the VPN connection.
In the .conf file of the VPN connection the following entries must be added (may be obsolete depending on the provider, for PureVPN you don't need it):
script-security 2
up /etc/openvpn/update-resolv-conf
down /etc/openvpn/update-resolv-conf

redirect-gateway
The call of the script update-resolv-conf when establishing and closing the VPN connection ensures that the correct DNS server is always used, redirect-gateway ensures that the data packets of the clients in the network are later passed through via the VPN connection. If all these settings are done, the first test run is started: with the command openvpn -config /etc/openvpn/meine-config.conf a VPN connection is established, in a second terminal you can see if it worked correctly. There you should see ifconfig display a new tun0 device:
tun0 Link encap:UNSPEC Hardware address 00-00-00-00-00-00-00-00-00-00-00-00-00-00-00-00-00
          inet Address:x.x.x.x P-z-P:x.x.x.x Mask:255.255.255.0
          UP POINT RUNNING NOARP MULTICAST MTU:1500 Metric:1
          RX packets:6005 errors:0 dropped:0 overruns:0 frame:0
          TX packets:6335 errors:0 dropped:0 overruns:0 carrier:0
          collisions:0 send queue length:100
          RX bytes:1554591 (1.4 MiB) TX bytes:625622 (610.9 KiB)
So the VPN connection works already once, OpenVPN can now be activated regularly via /etc/init.d/openvpn start and also starts automatically after a restart - now only data packets from devices in the local network have to be routed over this connection.
Setting up the gateway
First of all, packet forwarding must be activated. Since we want it to remain active even after a reboot, in the file /etc/sysctl.conf remove the comment sign in front of the following entry:
net.ipv4.ip_forward=1. After restarting the Pi once, then we also know if the VPN connection is built automatically - if this is the case, enable forwarding in iptables (the following settings worked for me at least, but iptables can be a bit tricky - if necessary you have to experiment a bit here)
~ # iptables -t nat -A POSTROUTING -o eth0 -j MASQUERADE
~ # iptables -t nat -A POSTROUTING -o tun0 -j MASQUERADE
If you want to use iptables with the same settings after a reboot, you can use the package iptables-persistent to install - this will save and reload the current iptables entries
Use of Wireguard
Using iptables you can redirect the traffic to the wireguard interface instead of the tun0 device of the OpenVPN connection. If you have a wireguard connection, the following command will show you what the network interface is called:
~ # ip a
In my setup, the interface is "wg0-client" - if you want to route traffic through this interface, the iptables rules have to be adjusted accordingly:
~ # iptables -t nat -A POSTROUTING -o wg0-client -j MASQUERADE
The challenge so far is to find a suitable VPN service that allows a wireguard connection to be established on the command line. If you know a suitable wireguard VPN service, feel free to share it in the comments - using a special app usually does not work.
Configuration of the end devices
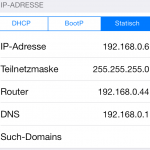
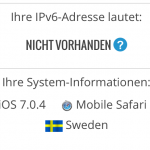 The IP address of the Raspberry Pi must now only be entered as the router on the end devices. In my case it is 192.168.0.44, on an iOS 7 device the settings will look like on the left. As soon as this has been done, all data packets (except for the DNS resolution, which is still taken over by the router in the home network) are routed via the Raspberry Pi and from there via the VPN connection - easily recognizable by the location of e.g. wieistmeineip.comwhich Sweden claims to be a country.
Raspberry Pi 2 as VPN gateway

With the newer and significantly more powerful Raspberry PI 2 Model B this setup can of course be carried out in the same way. The speed depends mainly on the VPN provider used - and the server to which the connection is made. With a server in Sweden and PureVPN as provider, 15 Mbit/s are possible (i.e. something like an average DSL connection, connections to the USA are much slower: here a good 6.5 Mbit/s are reached. For Netflix this is still sufficient after some buffering.
To speed up the surfing on US pages I have also created a DNS cache on the Raspberry Pi 2 installed: pdnsd caches the DNS requests that would otherwise be sent over the VPN connection and thus ensures a faster "surfing experience" when using the VPN connection.

Speed of the OpenVPN gateway and conclusion
The speed of this construction naturally depends on various factors: how fast is the network connection of the Raspberry Pi, how fast is the VPN connection, how fast is the DSL connection to the Internet, how fast is the WLAN. In my scenario, an iPhone 5 connected via 2.4 GHz WLAN gets a good 6.7 Mbit/s download via the Raspberry Pi gateway and almost 600kb/s upload. Instead of IPredator you can of course use any other OpenVPN provider - e.g. PureVPN.
As always with the instructions for the Pi or Raspberry Pi 2, which are based on the standard Raspian, the whole thing could also be realized with an x86 PC - only then with a significantly higher power consumption.
[amazon box="B07TF5PPPN"]



Thanks for sharing. I now have an RPI that connects to the company network via VPN using a Watchguard XTM 25.
Thanks for the article. I installed it on my Pi 2 without any problems. But the VPN over the gateway is extremely slow. The pings to google.com are also at 400ms.
CPU and memory usage I was able to exclude as a cause so far. It is not the VPN server itself, a direct connection from another computer runs very fast. The Pi only as a gateway without VPN works without problems.
Do you have any more tips on where I can go troubleshooting?
I got the same problem. Runs but is extremely slow.
I ordered a Raspberry Pi 2, so I'm going to check it again and update the article. Maybe I'll find a setup that will allow it with reasonable speed.
Cool offer @PureVPN
PureVPN offers a 2 year account with a free SmartDNS for 1.95 Euros/month for 2 years.
No logs.
It has more than 500 servers in 141 countries. (Up to 2 times faster than the other VPN service)
Simultaneous use on up to 5 devices.
7-DAY MONEY BACK GUARANTEE.
Strong military grade encryption.
Censorship-free streaming with SmartDNS
A wonderful deal. 🙂
https://www.purevpn.com/bestvpnprovider-special.php
The thread is a bit older, but I still have two questions.
Assuming I connect the laptop to my VPN provider through the RPi, but the rest of the network enabled devices do not, can I still access network shares?
So the laptop is still regularly connected to the network and only the connection to the outside is secured?
2 My VPN provider does not provide me with a .conf file but with an .ovpn file. Do you have any idea how to include it?
Greetings and thanks
1. only the connections to the Internet should be routed via the RPi Everything else should remain normal.
2. The .ovpn file is your .conf file.
Probably quite a stupid question and I am immediately stoned to death ( 😉 ), but:
No second LAN adapter, as in other router configurations, necessary?
No, it's all done through an interface. The external "interface" gets its IP via OpenVPN, internally the LAN remains accessible via the usual address.
Of course, two interfaces would also be possible, e.g. with a USB-WLAN stick
I've got everything set up and running so far, but:
"with the command openvpn -config /etc/openvpn/meine-config.conf a VPN connection is established", "OpenVPN can now be activated regularly via /etc/init.d/openvpn start and also starts automatically after a restart"
I'm afraid not. For me it is the /etc/openvpn/vpn.conf which is obviously not used, even if I enter it in /etc/default/openvpn under AUTOSTART="vpn". What do I have to do? (Currently I have to start the VPN manually again and again)
BTW: Is it possible to configure OpenVPN to use more than one processor core?
Hint: Port forwarding is also defined via iptables: e.g. "iptables -t nat -I PREROUTING -i tun0 -p tcp -dport 10000 -j DNAT -to-destination 192.168.178.100".
Try saving the configuration file with the extension .ovpn. It may not recognize the file properly otherwise, I did the observation with another setup. If it works then I update the instructions accordingly.
Aloha,
sorry to "misuse the commentary feature," but...
Has anyone been able to successfully set up port-fowards via iptables using the configuration described above and could they help me with my configuration?
[email protected]
For me the whole thing works pretty good with the Pi 2, I get between 10 and 20 Mbit. Run the whole thing for my WG-WLAN. My computer, which does NOT go online via your pi, has been doing strange things since then. Either the website does not open until the 2nd or 3rd call, or pictures are partly not loaded. I had similar problems when my Synology NAS was supposed to perform exactly the same function.
Then something probably already sparks between them. Are you sure there's no overlapping DNA settings?
Found the bug. It wasn't the pi, it was the adblocker.... 🙂
Hello Falk,
Can you tell me exactly what iptables does with these commands defined in TuT?
Can I undo all the changes I made?
What should I do if I don't want to have a vpn gateway but only want the outgoing traffic from the raspberry to go through the vpn provider?
The RAS is connected to my router ( internet ) via lan.
@moejoe
Just install OpenVPN and start with the unchanged config file (.ovpn)
You can undo everything with iptables - - flush. Then you just have to uninstall iptables-persistent.
The same with WireGuard would be brilliant
In fact, it shouldn't be that complicated, not a bad idea. The problem should be to find a suitable VPN service that supports Wireguard without special apps etc.